Sunday, February 27, 2011

Love is in the Air


Love is in the air. I spent the day yesterday at the Scrapbook Expo, then dinner with my family for my sister-in-law's birthday. I LOVE both things, crafty shopping, and my family. So, I am feeling the LOVE today!!!
Also, I just LOVE this paper, image, ribbon, die cut, etc, of this card I created. So, over here, Love Is In The Air!!!!
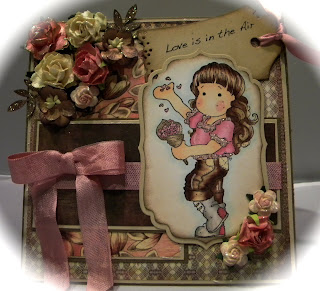
I used my Basic Grey curio paper pad for this card, which I adore! I love the rich colors of this paper, and the natural distressing it has, it is so pretty. The image I chose was Tilda Spreads Love from the new You're So Special collection from Magnolia. I love this cutie image, she is just so unique, and I think she is adorable.
I colored her up with copics.
Skin - E00, E000, R20, E11
Hair - E25, E31, E50
Shirt - RV10, R81, R000, RV000
Pants - E27, E25, E35, E31, E50
Boots - W00, W1, W3, R83, R85
Heart Bouquet - R81, RV10, R83, E41, E42, E43
Background - B0000, W00, W1, W3
I added Stardust stickles to the lace on her shirt and the heart glitter for some added shimmer.

Here is the artsy view of my card. All of my embellishments are from Wild Orchid Crafts. I used some of my FAVE new seam binding, and lots of flowers. I used cream 25mm roses, coral 20mm roses, dark brown cherry blossoms, and mini light pink 15mm roses. I added some punched branches and stardust stickles to EVERYTHING to finish it all off. IRL, it is SUPER sparkly!
The sentiment I printed out on my computer and then used my Magnolia Vintage Tag Doohickey die to cut it out. I then used some silk ribbon to tie it off.
Here is the finished off inside of the card. The same silk ribbon was added to finish off this simple inside.
I am entering this card into the following challenges:
Basic grey - Sketch
Simon Says - Coffee and Cream
Magnolia Down under - Flower Power
Bunny Zoes - Spring Flowers Everywhere
Paperplay - Let's get sentimental
Stamp Something - with Flowers
The Ribbon Girl - Cream, pink, brown

Saturday, February 26, 2011

DCD Christmas Club - DT -Sketch and use pink and blue

This week, over at Die Cut Dreams Christmas Club, our challenge is an amazing sketch by Karen, with the color challenge of blue and pink. The sketch is such a blast, and so much fun to work with, thanks Karen.
I used some of my Basic Grey Eskimo Kisses paper for this card. I love the colors of this paper, as it is perfect for non-traditional Christmas colors, yet still has that Christmas feel to them.
I colored up this cutie Tilda with copics
Skin - E00, E000, R20
Hair - E25, E31, E50
Clothes - BG13, BG11, BG10, R20
Ornament - R85, R83, R81, RV10. YG28, YG26 (gold stickles was added for some bling)
Background shadow - B0000
I distressed the image panel with Victorian Velvet distress ink to match the card colors.
Here is the arsty view of my card. I added some vintage lace I had in my stash, and a pink silk ribbon and bow. Then some sticky back pearls finish off this card.
I hope you will hop on over to Die Cut Dreams Christmas Club and join us this week.
I am entering this card into the following challenges:
Pixie Cottage - Something cute

Friday, February 25, 2011

Springtime Wishes

This card made top 5 at Magnolia Down Under!!!
This card made Top 5 at All that Scraps Magnolia Challenge!!

It is supposed to rain all weekend, and I am just so tired of the rain! UUGGHHH. So, I wanted to make a card that is cheerful, happy, and celebrates spring. So, here is what I came up with!
I made an easel card, so easy and so much fun to create. I LOVE these papers from Graphic 45, they are just so fun. Vintage, yet cheerful for a spring theme card. I love all the cherries, makes me think of picking fruit with my boys, one of my fave spring activities!! I distressed all of the papers with my Distrezz-it-all tool (LOVE that thing), and then distressed all the edges further with Vintage Photo and Walnut Stain Distress Inks. I used Tilda with Cherries for my image for this card, which matches the papers perfectly.
I colored up Tilda with copics:
Skin - E00, E000, E11, R20
Hair - E50, E31, E25, E27
Dress, Bandana, and socks - E40, E41, E42, E43, R27, R24, R22
Shoes - R29, R27, R24, R22, W5, W3, W1 ( I added Glossy Accents to make the shoes shiny and pretty)
Basket and Cherries - E27, E25, E31, E35, E50, E51, R27, R29, E24 (Diamond Stickles was added to the cherries for some extra sparkle)
Shadow and Background - W1, W3, W5, BG10, W00
Here is a close up of the details of the card. I added a flower arrangement using some Wild Orchids Crafts roses. I painted two 25mm white roses with Wheatfields Glimmer Mist. Then used a 25mm red rose and some cream 15mm mini roses. The swirl is a grungeboard swirl that I painted with Antique Linen Crackle Paint and then distressed with Walnut Stain Distress Ink. Tim Holtz Film strip was also added to the arrangement for a finishing touch. I added a charm to dangle from the bow, which I just love. It finishes off the card perfectly.
The inside portion of the card was done with more of the design paper and embellishments. The sentiment is a Greeting Farm stamp that I think is perfect for simple birthday sentiments.
Here is the artsy view of the front of the card.

I am entering this card into the following challenges:
7 Kids College Fund - Calling all squares
Anything Goes - Distressing
A Spoon Full of Sugar - Birthday wishes
Magnolia Down Under - Distressing
Totally Tilda - How does your Garden Grow
Simon Says - Coffee and cream

Thursday, February 24, 2011

Funky Fun

I LOVE this Cheeky Cherry Pie image from the Greeting Farm, isnt she adorable???!! I made this card following the case for Mystery Monday over at Club Anya.
I chose the patterned paper from October Afternoon Thrift Shop paperstack. I just LOVE this paper, it is gorgeous. I love all the bright colors and patterns, so pretty. I chose to stick mainly with yellow and red.
I colored up this cutie with copics
Skin - E000, E00, E11, R20
Hair - E31, E50, E53, Y11
Clothes - E40, E42, E41, Y15, Y13, Y02, R22, R24, R27, R29
Pie - W00, W1, W3, E55, E53, E50
Here is the artsy view of my card. I used some flowers from Wild Orchid Crafts. Yellow 25mm roses, and a red cherry blossom. I finished it off with some branches punched with my Martha Stewart punch.
Here is the finished off inside of the card. I used more of the design paper and red silk ribbon on the center panel. I just love this patterned paper! I like how this card turned out, I hope you do too!
I am entering this card into the following challenges:
Club Anya - Mystery Monday
7 Kids College Fund - Calling all Squares
Pile it on - Childhood Dreams
Color Create - 3 Fruits (Strawberry, Cherry, Banana)
Prairie Fairy Fridays - all in the fine print
Stamp Something - Something funky


Tuesday, February 22, 2011

contest

I have one my creations entered in a contest over at Lindy's Stamp Gang. Head on over and vote. My creation is #14, Love girl. Thanks so much for your support, voting ends tonight!!!

http://lindystampgang.blogspot.com/


Midnight Madness DT - MMSC92

This weeks sketch...it's "YOUR PICK" Make it fancy, clean and simple, or somewhere in-between. Remember to click on the sneak peek button on the side bar for the following weeks sketch each Friday.
"YOUR CHOICE"
Enter one style or both this week.
Just have fun and come play with us :)
*Our MMSC92 weekly Bonus sponsor is.....
http://robynsfetish.com/shop/
Robyn's Fetish Digital Stamps And More is proud to sponsor this challenge.
Robyn's Fetish Digital Stamps And More, a division of I Did It Creations, was created and is
owned by Robyn Weinrib. Robyn offers a wonderful variety of digital stamps and digital papers, designed to meet the needs of all digital paper crafting addicts for every occasion.
1 12 x 12 Tim Holtz Idea-ology paper pad “Vintage Shabby” pattern
1 Tim Holtz set of 96 “Adage” tickets
1 Martha Stewart Deep Edge Punch “Garden Trellis”
Then we are also including : 4 digital stamps of the winner’s choice from Robyn’s Fetish Digital Stamps And More
Thank you Robyn for your FABULOUS PRIZE this week.
~~~~~~~~~~~~~~~~~~~~~~~~~~~~~~~~~~~
**Our February Monthly sponsor is....
http://www.paperpretties.net/store/
Check out the monthly grand prize HERE.
Here is my card for this weeks sketch. I used the image, Basket of apples, from Paper Pretties, who is our monthly sponsor. This was definitely a challenge for me, as I am so used to coloring people for my images. However, I LOVE this apple basket, and think that this card turned out simply beautiful. I will definitely have to use objects as my images more often. I just love it.
I used some of my K&Company Mega Stack paper for the design paper of this card. I LOVE this stack, as it has every color and pattern you can think of. I loved the red and cream gingham pattern and thought it was the perfect pairing to the apple image.
I colored my image with copics -
Apples - R20, R22, R27, R24, R29, W3, E35, E33, G20, G24
Basket - E33, E31, E35, E27, E25, E29, E51
Blanket - R24, R27, R29, W00, W1, W3
Background - W00, W1, W3, R00, E50
Here is the artsy view of my card. I used my Lacey Circle Nestie to cut out the background circles, and then used the nestie as a stencil to trace and cut out the center from the design paper. The red and white ribbon is from my stash, and I added white pearls to the edges, as the sketch suggests. The flowers I used are from Iamroses.com, and they are a red rose, and two yellow cherry blossoms. I punched out the leaves with my Martha Stewart punch.
I hope you will join us this week at Midnight Madness, and I cant wait to see how you interpret the sketch.
I am entering this card into the following challenges:
Make it Colorful - Smooth Gradients
Copic Creations - Warm Colors
Totally Gorjuss - Check it Out
Totally Papercrafts - Do it with Digis
Bearly Mine - Ribbon and Pearls
Allsorts Challenge - Inspired by Nature

Saturday, February 19, 2011

Dancing for Love


I LOVE all the stamps from the new release, Your So Special, by Magnolia. Arnt they all so SUPER cute!!! With this card, I have used Dancing Party Tilda. I dont see her used that often in blogland, and I just think she is adorable.
For this card, I used one of my new paper packs by October Afternoon, Thrift Shop. I LOVE the vintage colors and patterns of this paper pack, so pretty. I went with the color combo of blue and yellow. I am trying to step out of my comfort zone more and work with different colors and combinations. I used cream cardstock and Kraft cardstock as matting, and love the vintage look it gives.
I colored this cutie with copics
Skin - E00, E000, E11, R20
Hair - E31, E53, YR20, Y11
Dress and socks - B97, B95, B91, B000
Shoes - E40, E41, E43
Shadow - E50, W1, W00, W3
I used lots of my new flowers from Wild Orchid Crafts, blue 25mm roses, yellow cherry blossoms, and blue two-tone 15mm open roses. I also punched out some branches with my Martha Stewart punch and distressed them with Stormy Sky distress ink. The butterflies were punched with my Monarch Martha Stewart punch out of some of the yellow patterned paper. I used my B97 copic to color the pearls that were added to the card, as they were white, but I wanted them to be blue to match the card.
I am entering this card into the following challenges:
Just Magnolia - Love you
7 Kids College Fund - Calling All Squares
Simon Says - Make your own embellishment (blue pearls)
Bunny Zoe's - Spring Flowers Everywhere
Magnolia Stamp Lovers - Spring Pastels
Charisma Cards - Spring has Sprung
Copic Oz - Love
Pile it On - Love plaid (the yellow patterned paper has a white plaid pattern, kinda hard to see in the pics)


DCD Christmas Club - DT -Make a card and matching tag set


Here is my card and matching tag for this weeks challenge over at Die Cut Dreams Christmas Challenge. I had so much fun making the card and tag for this week. I LOVE the images I used, and had a blast trying out new techniques in my coloring. Just love it!!!
I used My Minds Eye Paper Sweet Treats - Holiday Avenue,for this card, just LOVE that paper stack. The images I chose to use are the candy cane and Sitting Angel Tilda. Arnt they just adorable together.
Here is a close up of my card front. I used my Magnolia doohickey die, Tilda's lace for the border of my image. I think this is my fave border die, I just adore it.
I colored up these images with copics -
Skin - E000, E00, R20
Hair - E59, E57, E51
Dress - E40, E41, E43
Tights - R29, R27, R24, R20
Candy Cane - R29, R27, R24, R20, W1, W00, W5
Here is a close up view of my tag. I chose to just add Sitting Angel Tilda to the tag. I cut a regular tag out with my cricut on red cardsock, then used my doohickey die again to create the bottom border.
Thank you so much for looking, and I hope you will come over and join us at Die Cut Dreams Christmas Club, and get a head start on those Christmas cards and tags this week!

I am entering this creation into the following challenges:
Make it Colorful - Smooth Gradients

Friday, February 18, 2011

House of Gilli Design Team - Recipe

Here is my card for the first House of Gilli Challenge!!! How EXCITING!!! I am so happy to share my creation with you all. I chose to use Victorian Gilli which can be purchased at Stamping Scrapping, along with the other adorable Gilli stamps!!!
The challenge this week has been set by my lovely teamie, Suzanne Dean, and she chose a recipe. The recipe is 3 patterned papers, 2 die cuts/punches, and 1 form of glitter. I chose to make an easel card for my card this week. I LOVE easel cards, they are interactive, and easy to make.
I used K&Company Classic K paper stack. I LOVE the vintage and soft colors of this paper. I added stickles around the edges of each panel to give tons of shimmer, I hope the camera picks up some of it.
I used Victorian Gilli for my image this week. Isnt she so fancy??!!! I colored her up with copics.
Skin- Eoo, E00, R20
Hair - E25, E31, E50
Dress - R83, R81, R00, RV10, RV11
Hat - B35, B33, B31, R000, R01, R02, G20, G24
I added LOTS of stickles to this little cutie to give her lots of sparkle.
Here is the artsy view of my card!! the two punches I used are the Tilda Lace Magnolia Die for my panel border, and I used my Martha Stewart leaf punch to add leaves to the flower arrangement. Speaking of flowers, I used some white roses, that I painted with glimmer mist in Vintage Pink, and added white Cherry blossoms to even out the arrangement.
The inside of my card was finished off with more of the design paper, a pink silk bow, and another rose with leaf punch (which also serves as the stand for the easel).
I hope you hop on over to Stamping Scrapping and pick up some Gilli stamps for yourself. They are adorable!!! Then come on over and join us at House of Gilli for bi-weekly challenges!

I am entering this card into the following challenges:
papertake weekly - Putting on the glitz
Pile it on - Plaid
Really Reasonable Ribbon - Spring theme
ABC - O is for Old Fashioned
Charisma Cards - Spring has Sprung

Wednesday, February 16, 2011

Make a Wish

I LOVE this new stamp, Tilda with a Heart. I think she is my new fave. (I know, I love them all, and my fave just keeps on changing). But, I do love her. At first, I thought I would not use her that often as she has a heart, so it must be mostly for Valentine's day. HOWEVER, I have used her here for a birthday card, and I think she looks fantastic!!!
I went with some of my favorite colors, brown, pink, and cream. I love this color combo, as the soft colors just blend well together. The papers I used were from my K&Company HUGE stack, which I jut LOVE. I followed the sketch over at Just Magnolia, and really like how this card came together.
I colored this cutie-pie with copics -
Skin - E11, E00, E000, R20
Hair - E25, E31, E50
Dress & Socks - R85, R83, R81, RV10 (I added clear Spica pen to the ruffle for some shimmer)
Shoes - E40, E41, E42, E43
Heart - RV02, RV23, R0000 ( I also added clear Spica pen to the heart for shimmer)
Background - W00, W1, W3, B0000
The sentiment, Make a Wish (By The Greeting Farm), was stamped in the upper right corner with Walnut Stain distress ink. It was not dark enough, so I went over it with my black Spica pen. This completely darkened it up, and added a little sparkle. Just perfect!!
Here is the artsy view of my card. This view also shows off all of the sparkle I added to this card. The flowers I used are from Wild Orchid Crafts, pink roses, light brown cherry blossoms, and chocolate brown mini roses. I added Stardust stickles to the top edges of the petals. I also punched out leaves with my Martha Stewart punch to finish off the flower arrangements.
I finished off the inside of the card with more of the design paper and a pink silk ribbon and bow. There is lots of room for a personal note and sentiment. I just love how this entire card came together.
I am entering this card into the following challenges:
Just Magnolia - Sketch
Copic Creations - Warm Colors
All that Scraps Magnolia Challenges - Let's Celebrate Birthdays
7 Kids College Fund - Calling all Squares
Cupcake Craft Challenges - I heart you
Icopic Lover - Color Challenge (pink, brown, white)
Bearly Mine Challenges - Ribbons and pearls
Bunny Zoes - Spring Flowers Everywhere
Color Create - Chocolate, Strawberry, Cream
Stamping Scrapping - Pink Challenge

Cutie Patootie

My most recent creation, I chose to use one of my older Greeting Farm images, Flirty Anya. Isnt she just a doll???!!!
I chose to make this card bright and cheerie. It is supposed to rain here the rest of the week (I HATE the rain), and I needed something bright to cheer me up!! I used some of my papers from my K&Company HUGE stack. LOVE these papers, as there is a color and pattern for every occasion, it is so fun!!!
I used my Sew Easy tool and some white floss to give the sew effect on each panel. It is time consuming, but worth it in the end for the finished project looks so polished and complete.
I colored up this cutie with copics:
Skin - E11, E00, R20
Hair - E25, E31, E50
Dress, Shoes, Flower - R85, R83, R81, RV10 (I added a pink bling to the center of the flower in her hair. HOW CUTE!!!!)
Shadow - B0000, W1, W00
I distressed the panel that the image is on with Victorian Velvet distress ink to match the colors of the card.
I finished off the inside of the card with more of the same patterned paper, and some prima flowers. I left a nice place to write a personal sentiment. I thought this card was perfect for any occasion!
Here is the artsy view. I used some of my new seam binding ribbon from Wild Orchid Crafts. I kept it white to match the card, but scrunched and distressed it up so it is all crinkled! I added some layered prima flowers (the pink ones were white, and I glimmer misted them with pink taffy), and finished the card off with some pink bling! I hope you enjoy this card, and I thank you for stopping by!!!
I am entering this card into the following challenges:
The greeting farm - Farm Fresh friday color challenge
Bunny Zoe - Spring Flowers everywhere (flower paper, flower on image, flower embellies)
7 Kids College Fund - Calling all Squares
Papertake weekly - Putting on the glitz
Simon Says - Make your own embellishment (the pink flowers were white, and I glimmer misted them to match the card colors)