Sunday, January 30, 2011

DCD Christmas Club - DT -Special Birthday Blog Hop

This week over at Die cut Dreams Christmas Club Challenge we have Blog Hop to celebrate our 1st Birthday I hope you will all come and join in , you don't need to enter the challenge to join in the hop
But if you would like to then the theme of this challenge
(which by the way lasts for 2 weeks closing on Fri 4th @ noon GMT )
is to make a "Winter Themed Birthday card" with a winter scene or snowflakes or snow of some kind, this is the first time we haven't asked you to make a Christmas project for us, we can't wait to see what you make and the challenge prize this time is sponsored by the lovely
Roberta over at Prairie Fairy Designs
*****************************************

Here is my card for this special blog hop. Dont you just LOVE the background by Prairie Fairy?!!!
I used my Mind's Eye Sweet Dreams stack paper for the background design, and my new notebook edge punch (LOVE it) for the top border of the image. I wanted the image to take center stage, so it is large, and center focal point!
I colored the image with copics
Trees - G20, G21, G24, G14 (green stickles were added for accent)
Snow - W1, W3, W5 (Polar White flower soft was added to give texture and look like snow)
Tilda with Fir -
Skin - E000, E00, R20
Hair - Y11, Y23, E51, E55
Coat, hat, and tights - R20, R24, R27, R29, W1, W3 (Sugar Sparkly Fluff was added to the fur area of coat to give it texture and sparkle!)
Boots - W1, W3, W5, W7, R24, R27

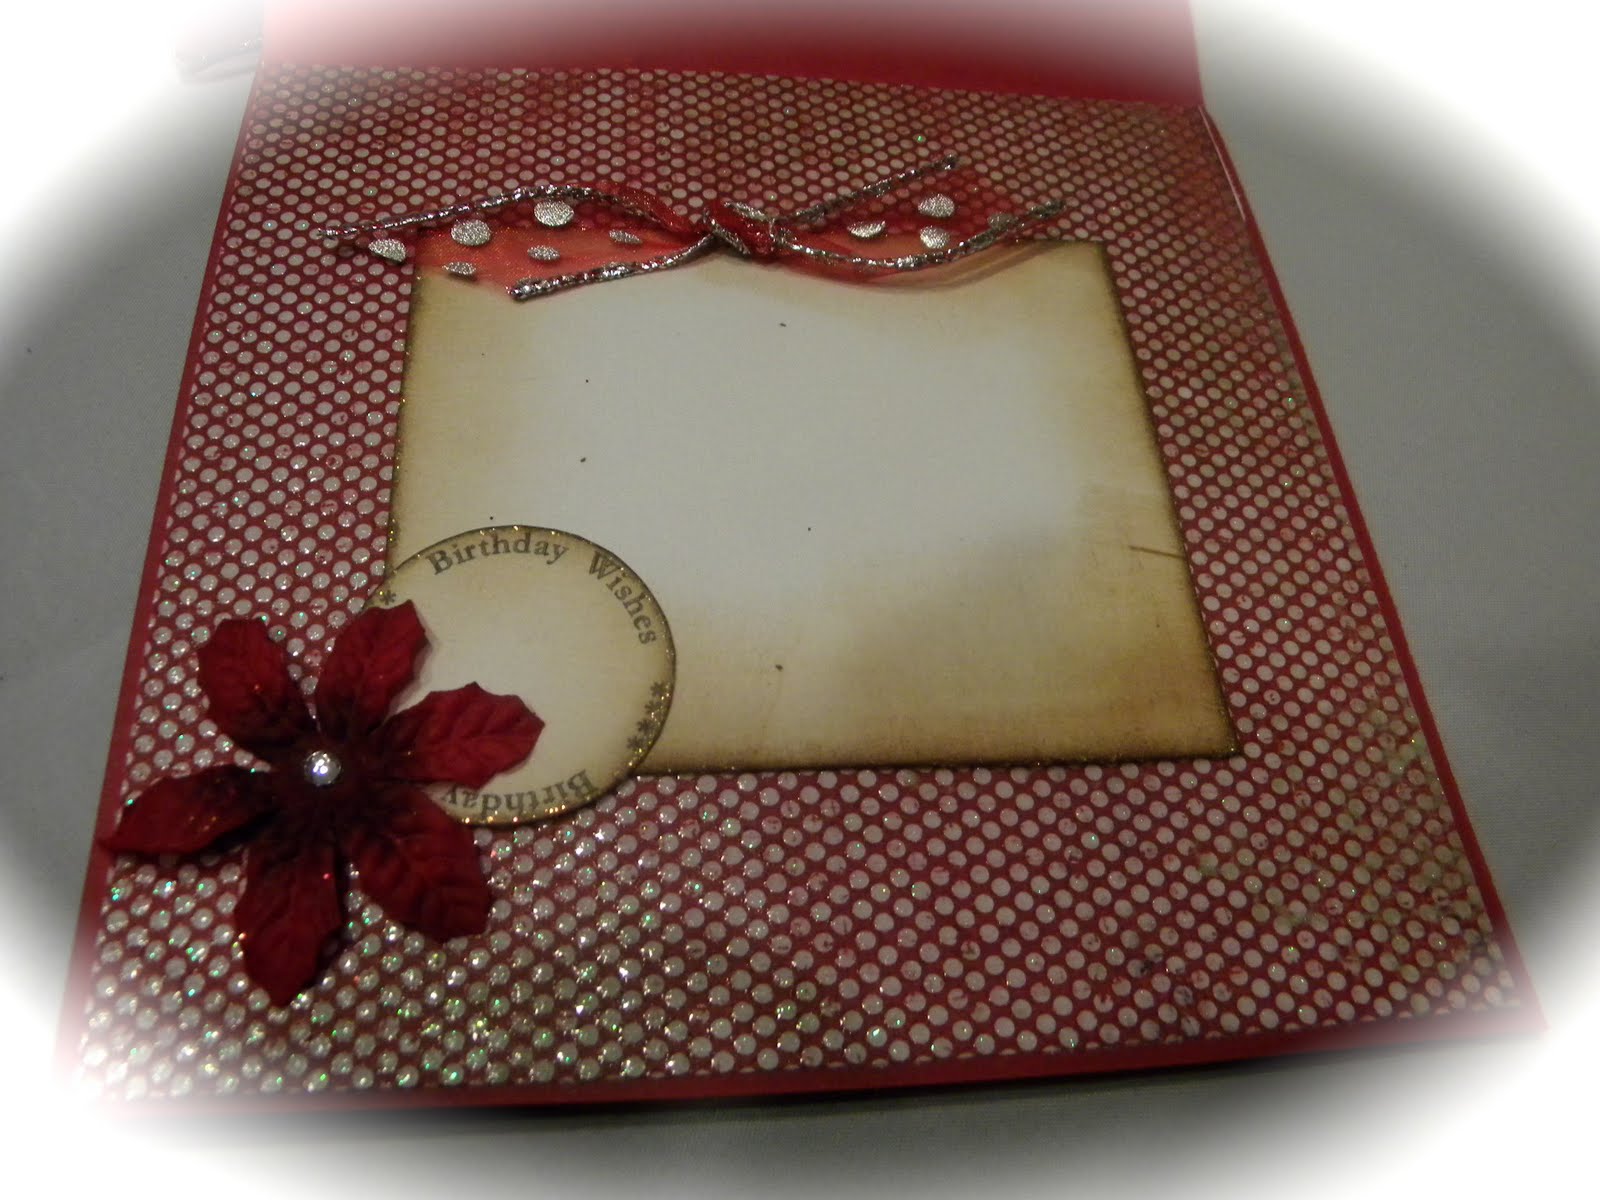
The inside of the card is finished off too. I distressed a white cardstock panel for a nice sentiment, added a Birthday wishes circle sentiment, along with a pointsettia flower and bling
Of course, it wouldn't be a proper Birthday Hop without a bit of CANDY!!! So, I will be giving away a sampling of Magnolia Images (Christmas theme, of course), some Reese's hearts (my fave Valentine candy), 20 6x6 sheets of the My Mind's Eye Sweet Dreams paper that I used on this card, and some bling!!!
For a chance to win just leave me a comment and complete the hop round all my DT girls blogs. Become a follower if you like my work. Here's the sequence of blogs you should hop round them all in this order and leave your comment on each
Susie (our fearless leader)
Karen
Becca (You are here!!!)
And lastly go back to the Die cut Dreams Christmas Club Challenge blog and leave a comment on this post Telling us you entered the Hop and you have visited all the DT Blogs!!
The Blog Hop prizes will be drawn next Sunday 30th Jan on all the individual blogs so remember to check back to see if you won.
************************
Also please don't forget to pop over and join in the fun and enter for a chance to win the fantastic prizes that's up for grabs from Prairie Fairy Designs this week , And you just have to go over and have look at the amazing creations my very talented Christmas Design Team have made for our celebration Challenge at the Die cut Dreams Christmas Club Challenge

I am entering this card into the following challenges:
Die Cut Dreams - Use a digi image and a stamped image together
Simon Says Stamp - BINGO (Glitter, Gems, Ribbon)
Delightful Sketches - Celebration
Pile it on - Anything Goes
Stamping Scrapping - Winter Challenge


Blog candy Winner

Thank you all for your lovely comments on the Die Cut Dreams Christmas Challenge Blog. I hope you all enjoyed the hop, and I thank you all for visiting my blog and leaving nice comments.

Ok, so now onto the winner of my blog candy.....


Linda Peo!!!!!

You win sweetie. Please email me at beccafabozzi@gmail.com within 7 days to claim your prize. Again, thank you all for your sweet comments and for following along with our birthday hop!

Tuesday, January 25, 2011

Midnight Maddness DT- MMSC88

This weeks sketch...it's "YOUR PICK" Make it fancy, clean and simple, or somewhere in-between. Remember to click on the sneak peek button on the side bar for the following weeks sketch each Friday.

"YOUR CHOICE"

Enter one style or both this week.

Just have fun and come play with us :)

~~~~~~~~~~~~~~~~~~~~~~~~~~~~~~~~~~~

*Our MMSC88 weekly Bonus sponsor is.....

http://www.thebearyscrap.com

The Beary Scrap is an online scrapbooking boutique carrying a little bit of everything for all types of paper crafters at 20% off retail pricing every day! Our stock includes gorgeous papers and embellishments by top manufacturers like Graphic 45, Bo Bunny, My Mind's Eye, and Echo Park. We carry gorgeous German Glass Glitter, Copic markers and Magnolia stamps as well as custom made mulberry papers and unique tear bear patterns. You are sure to find something "beary sweet" for your next project. Come visit our design team blog for loads of fun inspiration and twice-monthly challenges!


Thank you so much Susan for your fabulous prize!!

~~~~~~~~~~~~~~~~~~~~~~~~~~~~~~~~~~~

**Our January Monthly sponsor is....

http://www.lindystampgang.com/

Click HERE to see the Fantastic Prizes.

Here is my card for this week's sketch. I used the Heart tree from Priscilla Styles and Tilda with Lady Bug. I love the cute scene that these two images make together. I used Webster's Pages Nature collection paper, as the colors matched perfectly and gave fantastic soft colors to the card.
I changed up the sketch a little, as the oval shape just did not work with my images. SO, I cut the Tree out with my Lacey Circle Nestie die, and wove a silk ribbon through it. The ribbon was cream in color, and I used my Lindy's Stamp Gang Starburst Stain to dab the coral color onto the ribbon to match my card colors. I LOVE how perfectly it matches! I also used roses instead of hearts along the right side of my card, as the sketch suggested. Again, my Lindy's Stamp Gang Starburst stain came in handy. I painted white roses with the coral color again to match. Then I added some other pink roses and cherry blossoms to finish off the flower arrangement.
I colored my images with copics
Tree - E25, E51, E29, E57, G20, G21, G24, R83, R81, R000, R01, R02, RV11, RV14, R24
Ground and Grass - G20, G21, G24, E33, E31, E35
Tilda with Lady Bug
Skin - E000, E00, R20
Hair - E51, E25, E57, E29
Dress - E40, E41, E42, E43, R000, R01, R02
Boots - R000, R01, R02
I hope you will join us at Midnight Madness for this weeks sketch challenge, it is such a fun one!!!
I am entering this card into the following challenges:


Sunday, January 23, 2011

A New Journey

Let's embark on a New journey!! I am hoping to have many new adventures and embark on new journeys this year, and I thought this was the perfect little card to showcase my excitement for some new adventures in 2011!!!
I used the color scheme challenge at Magnolia-licious Challenge Blog, which is Orange and green. To be honest, I did not really like this color combo and did not think I was going to enter the challenge. Then, I was cleaning and organizing my craft room, and I came upon these Graphic 45 papers, and I thought, "wow, I LOVE those papers together". Then this little easel card was born! I LOVE how it turned out and all came together, and I am so glad that I challenged myself with these colors.
I used Tilda with back Pack from the Bon Voyage collection. I received this image from a swap, and I just LOVE her, and am going to add her to my next purchase. So cute! I think she goes great with my sentiment which is on the inside of the card.
I used lots of distress on this card. I distressed all the edges with my distress tool, added Vintage Photo and Walnut Stain to all the edges. I also tore some of the edges and stapled with my Tiny Attacher to show the backside of the patterned paper. I love how it looks.
The roses were painted with Olive Vine Glimmer mist, and then I added mini brown roses and Orange Cherry Blossoms, along with some leaves to finish off the arrangement.
I colored Tilda with copics
Skin - E000, E00, R20
Hair - Y11, Y23, E35
Shirt - G20, G21, G24
Pants - E31, E33, E35, E27, G20, G21
Shoes and Back Pack - E40, E41, E42, E43, E44, E27, E29
I cut Tilda out with my Nestie Label 8, and distressed the background with Tea Dye and Walnut stain Distress ink.
The inside of the card has the sentiment "embark on a new journey" from a Greeting Farm set I have. I love this sentiment. I cut it out with my nestie labels die. I distressed the inside panels of the card also, and added a green silk silk bow. This ribbon was white, and I sprayed it with my Olive Vine Glimmer mist to change to color to match my card.
I am entering this card into the following challenges:
Magnolia-licious Challenge - Orange and Green
7 Kids College Fund - Challenge Yourself (color combo)
Altered Alice - Hello or goodbye card
Paper Sundaes - Distress
Totally Gorjuss - Hot, hot , hot


Saturday, January 22, 2011

My heart is yours

Here is my first Valentine's card of the year. I have used a new paper stack from K&company, and I love the vibrant colors of it. I used lots of roses from Iamroses.com for this card. I used 1.5' roses that I painted with Sherbert Glimmer Mist, red cherry blossoms, yellow mini roses, and mini leaves that I painted with Key Lime Pie Glimmer mist.
I used Tilda wants a hug for this card. She is one of my favorite stamps, she is so versatile, and can be used for so many occasions. Since this is a Christmas stamp, she usually has holly in her hair. I covered up the holly leaves with two hearts that I cut out of cardstock and covered with Glitz stickles. I love how you can alter the image to get the look you want for any occasion.
I colored this cutie with copics
Skin - E000, E00, R20
Hair - Y11, Y20, E35
Dress and Socks - R00, R81, R83, R85, W1, W3, W5

I masked Tilda and stamped my Tim Holtz French Script stamp in the background with Antique Linen Distress ink, then I edged the inner circle with Victorian Velvet Distress ink to match the patterned paper. The image was cut out with my Lacey Circles Nestie.
I cut the scalloped heart out with my cricut and red cardstock. The I covered it with a HUGE dose of Diamond Dust. IRL, it is UBER sparkly and pretty. This pic does not do the sparkle justice.
The calendar stamp is a Whimsey, and it is the first time I have used it. It is a great stamp, and I love how it adds to the layout. I stamped it one white cardstock with Antique Linen Distress Ink, so it is subtle, and matches the paper perfectly.
I added gems to the corners of the card, and the sides of the calendar stamp to finish off the embellies on this card.
I finished off the inside of the card simply. I added some more of the patterned paper, and a white silk ribbon. I used my Lacey Circles Nestie die to cut the center for a sentiment and personal note.

I am entering this card into the following challenges:
Just Magnolia - Sketch
All That Scraps - Queen of Hearts
ATS Wednesdays Challenge - Early Valentines
7 Kids College Fund - Challenge yourself (masking, coloring techniques, Diamond Dust)
Simon Says - Bingo (Ribbon, Glitter, Gems)
Bunny zoes - Love is in the air
Cute Card Thursday - recipe (1 image, 2 patterned papers, 3 gems in each corner)

Tuesday, January 18, 2011

Midnight Maddness DT- MMSC87

Its a new challenge at Midnight Madness!!

This weeks sketch...it's "YOUR PICK" Make it fancy, clean and simple, or somewhere in-between.

"YOUR CHOICE"


Enter one style or both this week.

Just have fun and come play with us :)

*Our MMSC weekly Bonus sponsor is.....


http://priscillastyles-store.blogspot.com/

(redeemable for any images in the "dabbling with digis" line)


~~~~~~~~~~~~~~~~~~~~~~~~~~~~~~~~~~~

**Our January Monthly sponsor is....

http://www.lindystampgang.com/

Click HERE to see the Fantastic Prizes.


Here is my take on this weeks sketch for Midnight Madness. This week our sponsor is Pricilla Styles, and we were lucky enough to get to use some of her gorgeous images in our creations. I got the opportunity to use this gorgeous butterfly image. Isnt it just to die for??!!! I LOVE it.
This weeks sketch was so much fun, although I am not a fan of the triangle shaped matting, it is so hard for me to cut, I struggle with it, dont know why. I am a perfectionist, so that is probably why it is hard for me, I cant get the angles exactly right, so I struggle with getting it perfect!! LOL
Ok, so for my card, I used the Mariposa paper collection from DCWV, which was just perfect with this butterfly image. I cut the background for the butterfly with my lacy circles Nestability die. The black lace, was white, and I glimmer misted it with Black Gold Glimmer mist to make it black, I then added the pink silk ribbon and bow for finishing touches. I created the sentiment on my computer, and also punched out a butterfly with my MS Monarch punch. The black mini roses are two-toned mini roses from iamroses.com
I colored my image with copic markers
R000, R20, RV02, RV00 Then I added a touch of Lindy's Stamp Gang Magical Mica powder and some stickles to the top of the coloring to give it some sparkle and shine. IRL, it is totally sparkly!!!!
I am entering this card into the following challenges:
Paper Sundaes - birthday Blog Hop pick your fave past challenge - Challenge #38(Something from your stash)


Monday, January 17, 2011

Midsummer Birthday Wishes

This card made Top 3 at Totally Papercrafts!!!

Here is a new card I just finished. I used so many new items, I was just so excited to break them out!!! I used a new stamp, Midsummer Tilda, and just love her, she is just adorable!!!!
I followed the sketch at Simon Says Stamp for this week, and I absolutely LOVE how it came out. I used my new Basic Grey Curio paper pad. I think I am obsessed with this paper, the designs are so beautiful, I just love it!!!
the pink silk bow is one that I altered. It was white, and I died it with my new Starburst stain dabber from Lindy's Stamp Gang. I LOVE how it came out!
I also used my newer Tilda lace doohickey die to add an edge to the thiner layer, and I LOVE that thing, it is my new fave.
Here is the artsy view of my card. I added a flower arrangement to the top corner. I just got some new roses from iamroses.com, and I painted the large ones with Coffee Shop Glimmer Mist, the medium ones are from my friend Mindy, which I was fortunate enough to win her blog candy, and the tiny ones are ones I found in my stash. I love the arrangement of colors just match perfectly with the colors of the card!
I colored this cutie with copics.
Skin - E000, E00, R20
Hair - E51, E25, E57, E29
Dress - R000, R0000, R00, R01, R02, W1, W3
I also finished off the inside of the card with more of the designer paper and a couple of roses. I love how this just gives the card that finished look, and makes it ready to give away!
I am entering this card into the following challenges:
Simon Says - Sketch
Copic Creations - What's New
Just Magnolia - My Fave Things (paper, Maggie stamps, copics, flowers)
Paper Sundaes - birthday Blog Hop (I picked challenge #32, sketch)
Totally Papercrafts - Happy Birthday
Stamp Something - Anything Goes
Prairie Fairy Fridays - Happy Birthday


Saturday, January 15, 2011

Superstar!!!!

Superstar Anya, from the Greeting Farm, is such a fun image to work with! I loved this weeks challenge over at Club Anya so much for Mystery Monday, as they chose a great card for us to case. I love the different design of these papers together, as it is a combo I would have never chosen to use on my own. I love stepping out of my comfort zone, and trying something new, and I just LOVE this outcome.
I used my Tim holtz paper for the music note background paper, and then added a striped paper by K&Company in BRIGHT colors as the accent. I love how this paper pops against the muted music note paper. I stamped the sentiment "Superstar" from my Anya Says Stamp set by the Greeting Farm. The bottom vintage lace adds a soft and gentle feminine touch to the bottom of the card.
I then added a cream silk ribbon, which I criss-crossed across the paper and tied off in a bow. Then a prima flower, glimmer misted in Cosmos was added to the center with a big pink bling center. The grungeboard swirl was sprayed with my new Lindy's Stamp gang spray, so it is super sparkly, and the final touch was a punched butterfly from my MS Monarch punch (Love it).
I finished off the inside of the card with some more of the striped paper and some cream cardstock for a sentiment. I tiny cream ribbon was added.
I colored Anya with copics:
Skin - E000, E00, R20
Hair - Y11, Y23, E53
Shirt - E40, E41, E42
Pants - B91, B97, B99
Scarf and Shoes - RV11, RV14
Glasses - Y28
I am entering this card into the following challenges:
Club Anya - Mystery Monday
Oldie but a Goodie - Bright and Cheerful
Stamp Something - Anything Goes

DCD Christmas Club - DT - Lace


Here is my card for this weeks Challenge at Die Cuts Christmas Club. Our challenge this week is Lace!!! I kept this card SUPER simple, as I wanted the images to be the focal point of this weeks card.
Our sponsor this week is Robin Fetish Designs, so we all got to use one of her images for our cards this week. I chose these cute ornaments!!! I thought they were so perfect for Tilda to be sitting on, how stinkin cute!!!!!


I colored both images with copics.
Ornaments - R24, R27, R29, G20, G21, G24, Y15, Y13. I then covered the ornaments with glossy accents to make them shiny and added stickles to the center and top. IRL, they are super sparkly!!!
Hair - E51, E57, E59
Skin- E000, E00, R20
Dress, tights, and hat - E0000, E000, E33, R20, R24, R27, R29. I also added white sparkly fluff to the fur portion of her hat for some added texture and interest.
I am entering this card into the following challenges:

Friday, January 14, 2011

You hold the key to my heart

Here is a cute card I made for a couple challenges. I chose to use my new paper pad from Graphic 45, Springtime. I just love the colors of this paper, so pretty and vintage. I used Tilda with Key image, which is so sweet. I chose to make an easel card. They are so easy, and make such a nice and different card for the recipient, I just LOVE them.
I followed the sketch from Sketch Saturday, and distressed all the edges of my paper with my distress tool. I LOVE that look and think it works so nicely with this image, as she looks a little vintage. I added a pink silk ribbon, as I LOVE ribbon. The corner pieces were part of a Pink Paislee Artisan Elements set that I have, and I added some Tutu Pink Glimmer Glam paint to them to give them some glitter and shine, as well as adding a touch of color.
I colored up this cutie with copics
Skin - E000, E00, R20
Hair - Y11, Y23, E51, E53
Dress and socks- R0000, R000, R01, R02, Y20, Y23
Key - Y11, Y13, Y15
I added some roses from iamroses.com to the corner. The pink ones were painted with Vintage Pink Glimmer mist, the yellow were distressed with Vintage photo and Walnut Stain distress inks on the tips, and the white ones were sprayed with Gold Glimmer Mist to add a bit of distress color.
I used my Lacey Circles Nestabilitie to cut the inside portion and left it pretty simple so that a nice message can be written. I added three small roses, glimmer misted in Gold Glimmer mist, as the base for the easel card to sit on.
I am entering this card into the following challenges:
Delightful sketches - easel card
Icopic Lover - Color challenge - pink, cream, yellow
Just Magnolia - My favorite things (Graphic 45 paper, Flowers, Vintage, Ribbon)
Bunny Zoe's - Love is in the air
Paper Sundaes - Circles (Lacey Circle Nestie)
Paper play - Cutie Patootie
Creative Card Crew - Fancy Folds
Stamp Something - Anything Goes


Wednesday, January 12, 2011

Tilda with Tag Thanks You

This card made top 5 at Magnolia Down Under!!!!

My newest creation!! Here is a Thank you card I created using Tilda with Tag from the Valentine's release last year. This is an image I received from a friend of mine, and this is definitely a stamp I am going to HAVE to purchase, isnt she a doll? Plus, she can be used for so many occasions.
I used my new Basic Grey jovial card kit for this project. I do not have the paper pack, but I won the card kit from 7 Kids College Fund, adn thought I could use the pre-cut cards, and use it for my design paper, and it worked out great! I LOVE this paper, the colors are so rich and just gorgeous. It is not your typical Christmas paper, so it can be used for many occasions too! I added a red ribbon and bow, then put a white button in the center tied off with some red thread.
I added some prima flowers to the corner of the card that I painted with Cherry Glimmer mist. I also threw in one of my Tim Holtz journaling tags to the corner for an added touch. I hardly ever think to throw these in but what a great finishing touch it made to the corner bouquet.
My new years resolution was to finish off the inside of all of cards as I make them. I have been keeping it so far. Here is the simple inside of my card. I left room for a nice personal sentiment. this really shows off the design paper too, isnt it so pretty.
I colored this cutie with copics.
Skin - E000, E00, R20
Hair - E51, E25, E57, E59
Dress and socks - R20, R24, R27, R29, W1, W3
Tag - E40, E41, E42, E43, R27, R29
Shading - W1, W3, W5, B000

I also distressed the background Tilda is on with Vintage Photo and Walnut Stain Distress ink. I stamped my Tim Holtz splatter stamp on the edges for some added interest. I LOVE this technique, it just adds that something special!!!
I am entering this card into the following challenges:
Cupcake Crafts - Something New (New paper)
Just Magnolia - Anything Goes with Buttons
Basic grey Challenges - Dots and Spots